 Order
Now
Order
Now Midmark autoclave M9 and M11 printer Installation Instructions
| INSTALLATION (1) | |
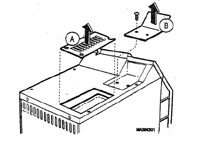 |
A. Unplug Sterilizer from wall unit and allow unit to cool, then remove top interspection cover. NOTE: After removal, place printer cover plate and two screws in storage in casr printer is reoved in the future and these parts are needed again. B. Remove two screws and printer cover plate. |
| INSTALLATION (2) | |
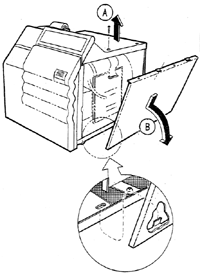 |
A. Remove two screws from top cover. B. Pull outward and down on top edge of right side panel and remove panel |
| INSTALLATION (3) | |
 |
Note: Harness clip must be installed on inside surface of top cover at the front, right corner of th einspection opening, that does not contain the conductive coating. A. Remove protective paper from adhesive of harness clip and press in position on inside of top cover. B. Insert rectangular plug onto J3 pin connector (marked printer cable) on the main P.C. board. Equipment Alert Assure printer harness is routed from board, inside covers, and through harness clip to prevent it from contacting th ehot pressure relief valve that could harm cable. C. Place printer in recess area of top cover and connect printer harness plug into printer. D. Place top inspection caover in postion assuring printer cable is routed through u shaped cutout in cover. E. Install side panel and plug unit into wall outlet and check operation using the instructions in the Installation/Operation Manual for the sterilizer. |